Showing posts with label Kiss. Show all posts
Showing posts with label Kiss. Show all posts
Pyramid point studded nails
I've been lazy over the last fortnight to paint my nails so it was time for some easy nail art with these pyramid point studded nails. I used 2 coats of Kester Black Violet (swatched here) and freehanded the triangles using Kiss Nail Art Striper in black and added a small round gold stud to the top of the triangle.


Hope you've all had a great weekend!
Hope you've all had a great weekend!
Snowflake Rudolph manicure
Another day another Christmas mani! This time with a little freehand nail art featuring everyone's favourite red nosed reindeer. For the snowflake nails I used 2 coats of one of my favourite blues Hello Darling Wading Pool (swatched here) and stamped full snowflake design from Moyou London Festive Collection plate 03 using Konad Special polish in white.
For the reindeers I used 2 coats of Cult Nails Tempest as my base and painted a semi circle for the reindeer head using Essie Hot Coco. I used China Glaze Ruby Pumps for the nose and Cult Nails Tempest for the eyes and Kiss nail art striper in black for the eyes, antlers and outline. Topped it all off with a coat of top coat!
Only a week and a bit left til Christmas eek! What are you wearing on your nails at the moment?
Pineapple manicure
Hello ladies! It is absolutely STINKING hot in Sydney at the moment - up to 38° in some parts of Sydney! So what better time to do some tropical fruit nail art! You know how much I love my fruit manicures ;) I decided on pineapples because this is the perfect weather for it and because I wanted to try out the cute design from Trophy Wife Nail Art. I seriously love Chelsea Bagan's work!

I used 2 coats of China Glaze Tart-y for the Party from the Avant Garden collection as a base for all nails. I then used Colour Theory Pineapple Express to freehand the body of the pineapple - the shade is SO well named I think! I used Kiss nail art striper in black to outline the pineapple and add the helixes and finished it off by using essence colour & go in the green & the grunge for the crown.

I haven't been able to polish my nails lately because my eczema has flared up really badly making removing polish a nightmare. You can see in the above pic I have a bad patch on my ring finger and my skin is just so dry and yuck X( It's just taking forever to clear up even though I've been hitting it with everything!! Doh!
I hope you guys are all doing well! What do you think of this fruity mani? Thanks for looking as always!
* Product(s) provided to me for consideration but this in no way influenced my review in any way. As always, my reviews are my 100% honest opinion. My Disclosure Policy can be viewed here.
I used 2 coats of China Glaze Tart-y for the Party from the Avant Garden collection as a base for all nails. I then used Colour Theory Pineapple Express to freehand the body of the pineapple - the shade is SO well named I think! I used Kiss nail art striper in black to outline the pineapple and add the helixes and finished it off by using essence colour & go in the green & the grunge for the crown.
I haven't been able to polish my nails lately because my eczema has flared up really badly making removing polish a nightmare. You can see in the above pic I have a bad patch on my ring finger and my skin is just so dry and yuck X( It's just taking forever to clear up even though I've been hitting it with everything!! Doh!
I hope you guys are all doing well! What do you think of this fruity mani? Thanks for looking as always!
* Product(s) provided to me for consideration but this in no way influenced my review in any way. As always, my reviews are my 100% honest opinion. My Disclosure Policy can be viewed here.
May/June 2013 hauls
Helloooooo! I thought I'd share my hauls for May and June with you all. I wasn't really been able to haul much in recent months due to my wedding but now I can do some hauling again yaaaaaaay =D I hauled mainly polish (what else seriously?!) of course!

China Glaze + pastels = MAJOR LEMMING so of course I had to get the Avant Garden Blooming Brights and Pastel Petals collections!! I love China Glaze pastels and these are just perfect.

I couldn't go past the gorgeous glitters and cremes in the Cult Nails Dance All Night collection and picked it up in the preorder sale and received a Wax That top coat free. I also picked up Nevermore which I've been wanting to get for ages and also Happy Ending as it was on sale hehe. I realised that I haven't purchased any Cult Nail polishes in 2 years!

I love the look of black and white glitters but hadn't added any to my stash yet so I picked up this cheap as chips glitter set from Models Prefer.

I've been stalking every Chemist Warehouse store near me and at work for sooooooooooooo long now for the W7 Sprinkles polishes and I FINALLY found them! Well I found 2 - Mosaic and Lava Flow - so I'm still on the hunt for Salt n Pepper. I have no idea why they're so hard to find!

A Pro Nail haul! I picked up China Glaze Texture Bump & Ground in May when I picked up the Avant Garden collections and then Color Club Almost Famous and OPI The Impossible when I went last week with Anita and Ange.

I love the white striper from the Kiss nail artist paint & stencil kit (you can read my full review of it here) and I've been needing another one but it's been so hard to find! I finally found it at Big W and on sale too woot.

I've been getting facials from Ella Rouge for the last few months and my beauty therapist recommended the HydroPeptide Anti-Wrinkle Dark Circle Concentrate. I've been on the hunt for a new eye cream and they had a 20% off sale so I decided to try it out. I haven't used it just yet as I'm finishing my Kiehl's one!

Hope you liked seeing my hauls for May and June! Thanks for looking as always =)
China Glaze + pastels = MAJOR LEMMING so of course I had to get the Avant Garden Blooming Brights and Pastel Petals collections!! I love China Glaze pastels and these are just perfect.
I couldn't go past the gorgeous glitters and cremes in the Cult Nails Dance All Night collection and picked it up in the preorder sale and received a Wax That top coat free. I also picked up Nevermore which I've been wanting to get for ages and also Happy Ending as it was on sale hehe. I realised that I haven't purchased any Cult Nail polishes in 2 years!
I love the look of black and white glitters but hadn't added any to my stash yet so I picked up this cheap as chips glitter set from Models Prefer.
I've been stalking every Chemist Warehouse store near me and at work for sooooooooooooo long now for the W7 Sprinkles polishes and I FINALLY found them! Well I found 2 - Mosaic and Lava Flow - so I'm still on the hunt for Salt n Pepper. I have no idea why they're so hard to find!
A Pro Nail haul! I picked up China Glaze Texture Bump & Ground in May when I picked up the Avant Garden collections and then Color Club Almost Famous and OPI The Impossible when I went last week with Anita and Ange.
I love the white striper from the Kiss nail artist paint & stencil kit (you can read my full review of it here) and I've been needing another one but it's been so hard to find! I finally found it at Big W and on sale too woot.
I've been getting facials from Ella Rouge for the last few months and my beauty therapist recommended the HydroPeptide Anti-Wrinkle Dark Circle Concentrate. I've been on the hunt for a new eye cream and they had a 20% off sale so I decided to try it out. I haven't used it just yet as I'm finishing my Kiehl's one!
Hope you liked seeing my hauls for May and June! Thanks for looking as always =)
Santa suit manicure
Hi ladies I have for you my first Christmas manicure of the year! Well not exactly the first as I've done a few plain Xmas skittles but I didn't bother taking photos of them because they were't super exciting. I haven't done a santa suit mani before so thought I'd give it a go! Not the neatest job because I haven't done any nail art in ages so I'm rusty but oh well! I threw in some trusty glitter so you get distracted LOL.


Candy stripe nails
Work is stressing me out big time at the moment so I've been changing my manicures almost daily to keep sane. I wanted something bright today so I went with a super quick and easy candy stripe nails. My stripes are far from perfect because my white striper is getting way too thick even with thinner and it's beyond saving!! Grrrrr. I think it's time for a new one...


Simple nautical nails
Hi ladies! Today I have a simple and loosely inspired nautical manicure for you. I love nautical stuff and I've been meaning to do nautical nails for ages now! I wanted to do more with this mani such as add an anchor and more stripes etc but ran out of time so I had to leave it as is xp

For my pinky and middle fingers I used 2 coats of Essence 50's Girl Reloaded Back to the 50's from my dear friend Christina. It is a GORGEOUS red but my camera found it a bit difficult to capture. It's quite dark in real life and the last pic shows it most accurately.
For my ring finger I used 2 coats of OPI Glitzerland as a base and my favourite gold glitter Milani Jewel FX in gold. My index finger is 3 coats of OPI Alpine Snow and for my thumb I used 2 coats of LAKA 81 which is a super opaque navy creme. I then used my trusty Kiss Nail Art Paint striper in white to draw thick horizontal lines.


What do you think of nautical nails? A full nautical mani to follow soon hopefully!
Thanks for looking as always!
For my pinky and middle fingers I used 2 coats of Essence 50's Girl Reloaded Back to the 50's from my dear friend Christina. It is a GORGEOUS red but my camera found it a bit difficult to capture. It's quite dark in real life and the last pic shows it most accurately.
For my ring finger I used 2 coats of OPI Glitzerland as a base and my favourite gold glitter Milani Jewel FX in gold. My index finger is 3 coats of OPI Alpine Snow and for my thumb I used 2 coats of LAKA 81 which is a super opaque navy creme. I then used my trusty Kiss Nail Art Paint striper in white to draw thick horizontal lines.
What do you think of nautical nails? A full nautical mani to follow soon hopefully!
Thanks for looking as always!
Review: Kiss Nail Dress
Hi ladies! Today I have the new Kiss Nail Dress nail strips for you. Kiss make awesome nail art stripers which you'll have heard me mention many times in my nail art posts (you can read my full review of them here) so I was interested to try these out. I was very kindly sent two designs to try and I have my review of the gorgeous lace design Mini.

What they say:
"Kiss Nail Dress is the ultimate nail fashion, offering more nail strips per kit than any other brand. Available in 18 patterns and textures, there is something for everyone. With so many style options to choose from, let your inner designer shine through with that pop of color. As you would spice up an outfit with some sparkle and shine, you can now “express” yourself by applying jeweled strips to your nails for that extra punch.
Each manicure is unique with asymmetrical designs. Nail Dress gives you the ability to customize your nails as Nail Art. You can mix and match any texture and pattern by cutting up Nail Dress and applying the strips in any shape or form desired to revamp any look, day or night."

Each pack contains instructions, a nail file and 28 nail strips in 14 different sizes. Plenty in case you mess a few up!

I thought I'd do a little step by step on how to apply them!
Step 1: Select size that fits your nail

Step 2: Smooth and fold over edge

Step 3: File excess

Done!

Overall: I think this design looks absolutely fantastic! I love lace patterns and these look really elegant without the hassle of dealing with lace or stamping. I was complimented SO many times when I wore these! There is a great range of sizes provided in the packs and I found sizes that fit my nails perfectly. I have huge nail beds and I find the strips of other brands are either too small or too large. I had no overlap with my cuticle and no huge gap which is great.
They are very simple to remove as well - just peel off and no remover is needed and don't leave a sticky residue when you remove them. I wore these for about 4 days and had no lifting so I think would last a good few days longer.
I found these nail strips slightly easier to apply than other nail strips I've tried before as they are thicker which makes them easy to position and less likely to tear. But because these are quite thick I found it quite tricky to file the excess down which meant it took longer than I expected to apply. The edge also felt quite course after filing down so they caught onto my clothing which was very annoying. They also felt quite thick on the nail to me but this is a personal thing.

Details: Kiss Nail Dress are available now from Priceline and selected pharmacies nationwide for $13.95.
What do you think? Have you tried these before? Thanks for looking as always!
The product featured in this post was provided to me for consideration but this in no way influenced my review in any way. As always, my reviews are my 100% honest opinion. My Disclosure Policy can be viewed here.
What they say:
Each manicure is unique with asymmetrical designs. Nail Dress gives you the ability to customize your nails as Nail Art. You can mix and match any texture and pattern by cutting up Nail Dress and applying the strips in any shape or form desired to revamp any look, day or night."
Each pack contains instructions, a nail file and 28 nail strips in 14 different sizes. Plenty in case you mess a few up!
I thought I'd do a little step by step on how to apply them!
Step 1: Select size that fits your nail
Step 2: Smooth and fold over edge
Step 3: File excess
Done!
Overall: I think this design looks absolutely fantastic! I love lace patterns and these look really elegant without the hassle of dealing with lace or stamping. I was complimented SO many times when I wore these! There is a great range of sizes provided in the packs and I found sizes that fit my nails perfectly. I have huge nail beds and I find the strips of other brands are either too small or too large. I had no overlap with my cuticle and no huge gap which is great.
They are very simple to remove as well - just peel off and no remover is needed and don't leave a sticky residue when you remove them. I wore these for about 4 days and had no lifting so I think would last a good few days longer.
I found these nail strips slightly easier to apply than other nail strips I've tried before as they are thicker which makes them easy to position and less likely to tear. But because these are quite thick I found it quite tricky to file the excess down which meant it took longer than I expected to apply. The edge also felt quite course after filing down so they caught onto my clothing which was very annoying. They also felt quite thick on the nail to me but this is a personal thing.
Details: Kiss Nail Dress are available now from Priceline and selected pharmacies nationwide for $13.95.
What do you think? Have you tried these before? Thanks for looking as always!
The product featured in this post was provided to me for consideration but this in no way influenced my review in any way. As always, my reviews are my 100% honest opinion. My Disclosure Policy can be viewed here.
Peter Pan Collar nails
Today's manicure is inspired by this adorable peter pan collar nail tutorial over at The Beauty Department. They do some really cute nail and makeup tutorials! I only discovered the site a little while ago so clearly I've been living under a rock haha. I'm kind of stuck in a nail art rut at the moment so I thought I would try the design out! It's a dodgy job as you can clearly see the black peeking out from beneath the white collars and my index finger is stuffed up. Oh well! I also completely stuffed up my right hand so it looks like I painted in the dark or something haha!

I stuck pretty closely to the easy to follow tutorial. I used binder reinforcements to section off my nail and used 2 coats of Color Club Where's the Soiree for the shirt. I then used a small nail art brush and Kiss nail art striper in white to draw the collars. I then added 3 gold bullions down the centre of each nail.
For my thumb I used 2 coats of Color Club Where's the Soiree and 1 coat of China Glaze Medallion.

I could have done a much better job at cleaning up but couldn't be bothered oops! Also I need some new nail art brushes as mine are getting a bit tattered so they don't give a clean line.


I look terribly silly in peter pan collar shirts but I loved wearing them on my nails instead! XD What do you think?
Thanks for looking as always!
I stuck pretty closely to the easy to follow tutorial. I used binder reinforcements to section off my nail and used 2 coats of Color Club Where's the Soiree for the shirt. I then used a small nail art brush and Kiss nail art striper in white to draw the collars. I then added 3 gold bullions down the centre of each nail.
For my thumb I used 2 coats of Color Club Where's the Soiree and 1 coat of China Glaze Medallion.
I could have done a much better job at cleaning up but couldn't be bothered oops! Also I need some new nail art brushes as mine are getting a bit tattered so they don't give a clean line.
I look terribly silly in peter pan collar shirts but I loved wearing them on my nails instead! XD What do you think?
Thanks for looking as always!
Easter chick manicure
Today I I have another Easter manicure for you! Hopefully you guys aren't sick of them yet! Just a really simple yellow mani with a little chick as an accent. Although my chick looks a tad wonky haha - I think it's the eyes Xp
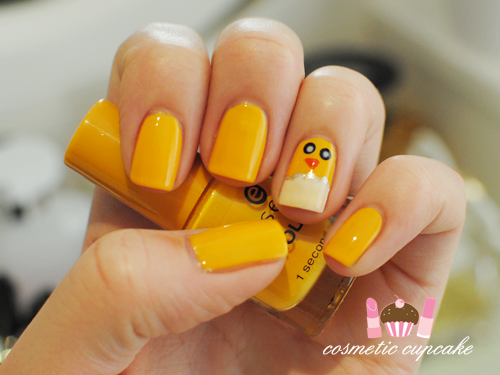
I used 3 coats of Essence Sundancer as my base which is a gorgeous amber yellow creme. I was going to do nail art on each nail but it's SUCH a lovely yellow I left it as is!

For the chick, I used a small nail art brush* from Born Pretty Store and OPI Alpine Snow for the egg. For the beak I used the same nail art brush and Sinful Colors Big Daddy. For the eyes I used Kiss nail art paint striper in black and OPI Alpine Snow and 2 different sized dotting tools. Lastly I outlined the egg with Face of Australia Titanium.


What are you rocking on your nails this Easter? I hope you're all having a lovely Easter! Thanks for looking as always =)
* Product(s) provided to me for consideration but this in no way influenced my review in any way. As always, my reviews are my 100% honest opinion. My Disclosure Policy can be viewed here.
I used 3 coats of Essence Sundancer as my base which is a gorgeous amber yellow creme. I was going to do nail art on each nail but it's SUCH a lovely yellow I left it as is!
For the chick, I used a small nail art brush* from Born Pretty Store and OPI Alpine Snow for the egg. For the beak I used the same nail art brush and Sinful Colors Big Daddy. For the eyes I used Kiss nail art paint striper in black and OPI Alpine Snow and 2 different sized dotting tools. Lastly I outlined the egg with Face of Australia Titanium.
What are you rocking on your nails this Easter? I hope you're all having a lovely Easter! Thanks for looking as always =)
* Product(s) provided to me for consideration but this in no way influenced my review in any way. As always, my reviews are my 100% honest opinion. My Disclosure Policy can be viewed here.
Easter nails: Cadbury Creme Egg manicure
So I am kind of obsessed with Cadbury Creme Eggs. They just taste so darn good and come Easter time I head straight for the store to get my yearly fix! Now that I'm older and wiser slightly more health conscious I limit myself to one bag of creme eggs only. As you know, I love doing themed/inspired/festive manicures and I have wanted to do a manicure inspired by my favourite Easter eggs since I started my blog. The problem was I always ate them all before I could do my mani! This year I restrained myself so here is my Cadbury Creme Egg manicure for you all!
Apologies in advance for the picture spam. I couldn't resist - I really enjoyed this mani! It might be a bit much for some but hey nail art to me should be FUN!
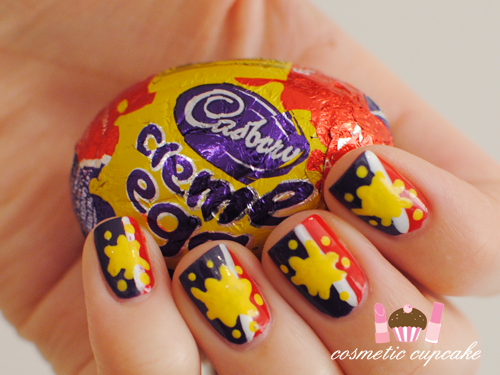
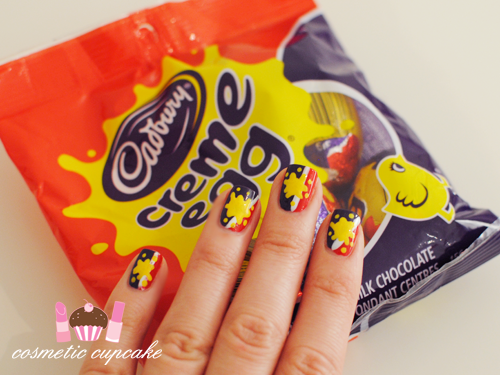
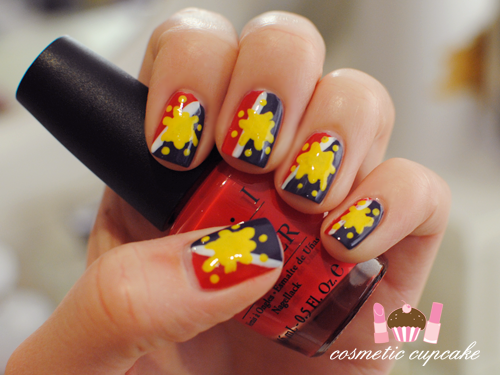
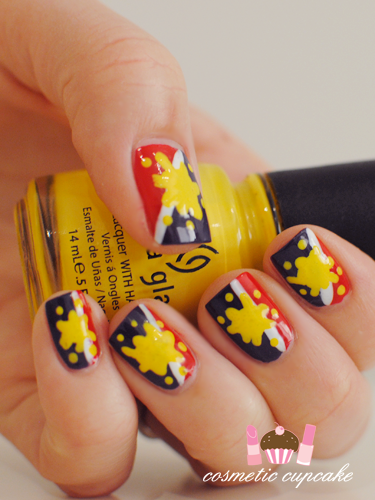
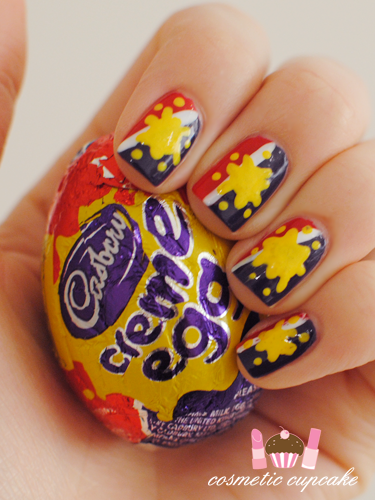
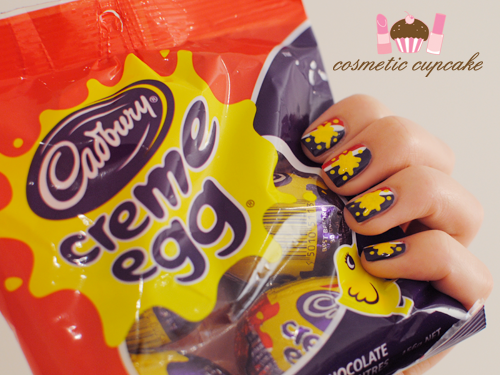
I used 2 coats of Models Own Pure Purple (a gorgeous dark purple creme gifted to me from Christina!) onto half of each nail. I alternated the positioning of the purple on each nail and then filled in the rest of each nail with OPI Red My Fortune Cookie using a nail art brush. I then used Kiss nail art paint striper in white to freehand a vertical line where the 2 colours met.
For the splatter/yolk, I dropped a large blob (such a technical word HAHA) of China Glaze Happy Go Lucky onto the middle of each nail and dragged it out quickly using a small dotting tool. I then added some random dots with the dotting tool around the splat.
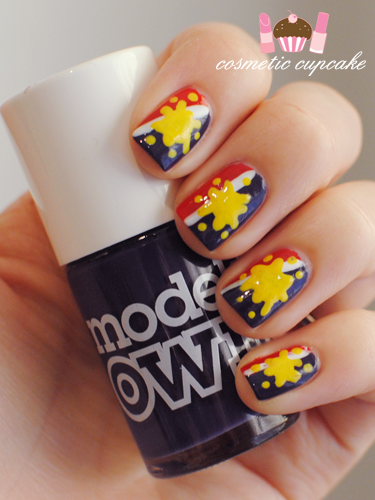
Pure Purple is such a gorgeous shade however it's a blurple so it was ridiculously hard trying to capture the colour properly. It's a dark purple but isn't as dark as it looks in my pics.
MMMMMMMMMMMMMMMMMMMMMMMMMMMMMMMMMMM...
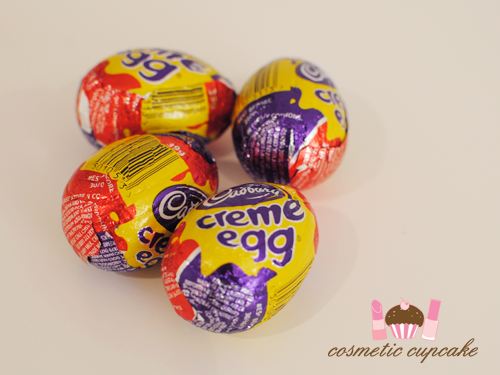
What do you think? Does it remind you of Creme Eggs?
Thanks for looking as always! Don't forget to enter my Hello Kitty Cosmetics giveaway here!
Apologies in advance for the picture spam. I couldn't resist - I really enjoyed this mani! It might be a bit much for some but hey nail art to me should be FUN!
I used 2 coats of Models Own Pure Purple (a gorgeous dark purple creme gifted to me from Christina!) onto half of each nail. I alternated the positioning of the purple on each nail and then filled in the rest of each nail with OPI Red My Fortune Cookie using a nail art brush. I then used Kiss nail art paint striper in white to freehand a vertical line where the 2 colours met.
For the splatter/yolk, I dropped a large blob (such a technical word HAHA) of China Glaze Happy Go Lucky onto the middle of each nail and dragged it out quickly using a small dotting tool. I then added some random dots with the dotting tool around the splat.
Pure Purple is such a gorgeous shade however it's a blurple so it was ridiculously hard trying to capture the colour properly. It's a dark purple but isn't as dark as it looks in my pics.
MMMMMMMMMMMMMMMMMMMMMMMMMMMMMMMMMMM...
What do you think? Does it remind you of Creme Eggs?
Thanks for looking as always! Don't forget to enter my Hello Kitty Cosmetics giveaway here!
Subscribe to:
Posts (Atom)