Showing posts with label Born Pretty Store. Show all posts
Showing posts with label Born Pretty Store. Show all posts
Monkey nail dryer from Born Pretty Store
The lovely folks at Born Pretty Store kindly sent me over THE cutest nail dryer to try out last month! It's in the shape of a monkey! I polish my nails late at night so a nail dryer is a must for me or else it takes forever to do my nails. I currently use one by Manicare (you can see it in my nail storage post here) which has served me well for many years.

The dryer is in the shape of a monkey (obviously) and has a small grey disc with a bunch of bananas painted on it. It runs on 2AA batteries (which are not included) that go in the back.

To use it, you place 2-3 fingers on the grey disc and press down lightly. The air blows from a small hole just above the disc which I've circled in the pic below (where the monkeys hands meet) and not from the mouth like you'd expect.


Overall: Because the air blows from such a low point, I don't find the dryer really all that effective. The angle just isn't enough to dry more than one finger and the fan is not that strong either. However, is this not the most adorable nail dryer you've seen?! My sister is born in the Year of the Monkey and although she doesn't like polish she tried to claim the dryer as soon as I opened the package lol xp I help run a mother's group at work and one of the little girls that attends LOVES nail polish so I paint her nails whenever she goes to the group. I brought the dryer in one week and she actually stood still for her nails to "dry"!
Details: The monkey nail dryer is available from Born Pretty Store for $8.15 You can use the code MICHELLEW21 to receive 5% off your order! Code is valid until April 30th 2012 =)
Do you use a nail dryer? Thanks for looking as always! Don't forget to enter my Hello Kitty Cosmetics giveaway here!
The product featured in this post was provided to me for consideration but this in no way influenced my review in any way. As always, my reviews are my 100% honest opinion. My Disclosure Policy can be viewed here.
The dryer is in the shape of a monkey (obviously) and has a small grey disc with a bunch of bananas painted on it. It runs on 2AA batteries (which are not included) that go in the back.
To use it, you place 2-3 fingers on the grey disc and press down lightly. The air blows from a small hole just above the disc which I've circled in the pic below (where the monkeys hands meet) and not from the mouth like you'd expect.
Overall: Because the air blows from such a low point, I don't find the dryer really all that effective. The angle just isn't enough to dry more than one finger and the fan is not that strong either. However, is this not the most adorable nail dryer you've seen?! My sister is born in the Year of the Monkey and although she doesn't like polish she tried to claim the dryer as soon as I opened the package lol xp I help run a mother's group at work and one of the little girls that attends LOVES nail polish so I paint her nails whenever she goes to the group. I brought the dryer in one week and she actually stood still for her nails to "dry"!
Details: The monkey nail dryer is available from Born Pretty Store for $8.15 You can use the code MICHELLEW21 to receive 5% off your order! Code is valid until April 30th 2012 =)
Do you use a nail dryer? Thanks for looking as always! Don't forget to enter my Hello Kitty Cosmetics giveaway here!
The product featured in this post was provided to me for consideration but this in no way influenced my review in any way. As always, my reviews are my 100% honest opinion. My Disclosure Policy can be viewed here.
A hot pink NOTD
Today I have a quick hot pink mani for you guys. Sometimes I get really sick of my manis so I have to change my polish daily. Normally I do it 2nd daily xp I usually only have time for a plain mani if I'm changing my polish everyday but I can't have a mani without nail art so I have to compromise and just add a glitter accent or a nail decal lol. This mani was a 15minute job that I'm not very happy with but I got quite a few compliments on it. Weird!
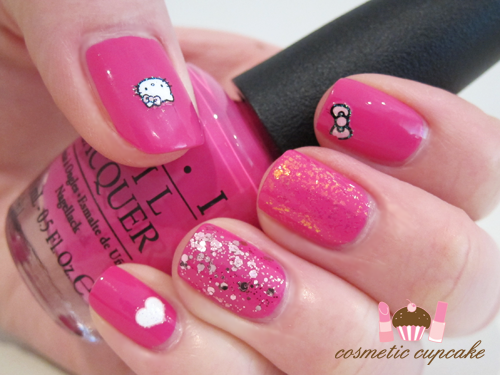
I stuck the Hello Kitty nail sticker upside down. FAIL.
I used two coats of OPI Kiss Me On My Tulips* from the Holland collection on all fingers. In real life the colour is slightly darker than my photos. By the way I'll have my swatches and review of the Holland collection up very soon for you all! I used 1 coat of Essie Luxeffects A Cut Above on my ring finger and 1 coat of Shine of the Times on my middle finger.
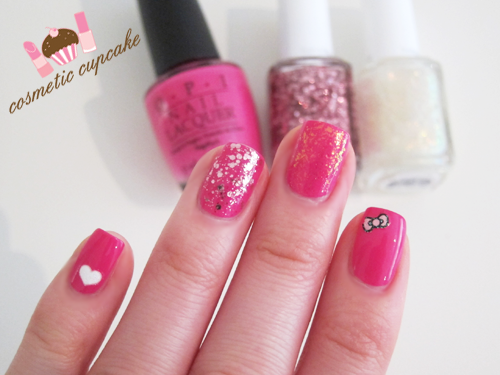
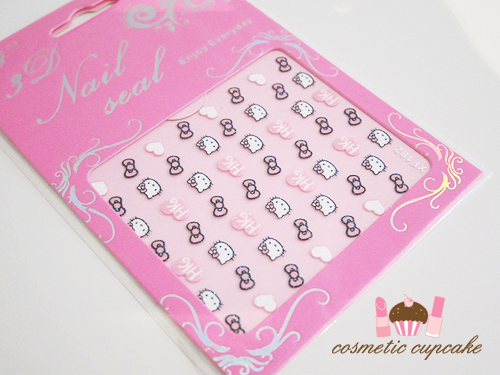
I then added some cute heart and bow Hello Kitty nail stickers* I received from Born Pretty Store which you can find here. They are so adorable and excellent quality! If you want to get your hands on these nail stickers and other awesome nail art items, you can use the code MICHELLEW21 to receive 5% off your order! Code is valid until April 30th 2012 =)
What do you think? Thanks for looking as always!
* Product(s) sent to me for consideration but this in no way influenced my review in any way. As always, my reviews are my 100% honest opinion. My Disclosure Policy can be viewed here.
I used two coats of OPI Kiss Me On My Tulips* from the Holland collection on all fingers. In real life the colour is slightly darker than my photos. By the way I'll have my swatches and review of the Holland collection up very soon for you all! I used 1 coat of Essie Luxeffects A Cut Above on my ring finger and 1 coat of Shine of the Times on my middle finger.
I then added some cute heart and bow Hello Kitty nail stickers* I received from Born Pretty Store which you can find here. They are so adorable and excellent quality! If you want to get your hands on these nail stickers and other awesome nail art items, you can use the code MICHELLEW21 to receive 5% off your order! Code is valid until April 30th 2012 =)
What do you think? Thanks for looking as always!
* Product(s) sent to me for consideration but this in no way influenced my review in any way. As always, my reviews are my 100% honest opinion. My Disclosure Policy can be viewed here.
Bumblebee manicure
Hi ladies! I've wanted to do a bumbleebee mani for ages now and I finally got a chance to last night! Unfortunately it kinda sucks *hangs head* But woohoo for the awesomeness of DSLR cameras so it doesn't look as crap as it does in real life haha. I need to get better at freehand! Here's my crappy attempt for you.

I used 2 coats of Barry M Blueberry ice-cream as a base. For the trails, I used a small nail art brush* from Born Pretty Store and Kiss nail art striper in black to draw short lines. For the bee, I used a small nail art brush* to draw an oval using China Glaze Happy Go Lucky for the body and added lines and outline using Kiss nail art striper in black. For the wings I used a large dotting tool* also from Born Pretty Store and Kiss nail art striper in white.
For my thumb I wanted clouds! I stamped full cloud design from Konad plate m79 using Konad Special polish in white. Topped it all with a coat of Konad Special topcoat and then a coat of my HG Color Club Vivid Color Intensifying topcoat.

You can't really see from my pics but my Konad topcoat makes my mani bubble!! GAH. But unfortunately when I do nail art using black I almost always tend to be too heavy handed when applying topcoat and end up smearing a finger or two so I need to use the Konad topcoat..

What do you think? Thanks for looking as always! =)
* Product(s) sent to me for consideration but this in no way influenced my review in any way. As always, my reviews are my 100% honest opinion. My Disclosure Policy can be viewed here.
I used 2 coats of Barry M Blueberry ice-cream as a base. For the trails, I used a small nail art brush* from Born Pretty Store and Kiss nail art striper in black to draw short lines. For the bee, I used a small nail art brush* to draw an oval using China Glaze Happy Go Lucky for the body and added lines and outline using Kiss nail art striper in black. For the wings I used a large dotting tool* also from Born Pretty Store and Kiss nail art striper in white.
For my thumb I wanted clouds! I stamped full cloud design from Konad plate m79 using Konad Special polish in white. Topped it all with a coat of Konad Special topcoat and then a coat of my HG Color Club Vivid Color Intensifying topcoat.
You can't really see from my pics but my Konad topcoat makes my mani bubble!! GAH. But unfortunately when I do nail art using black I almost always tend to be too heavy handed when applying topcoat and end up smearing a finger or two so I need to use the Konad topcoat..
What do you think? Thanks for looking as always! =)
* Product(s) sent to me for consideration but this in no way influenced my review in any way. As always, my reviews are my 100% honest opinion. My Disclosure Policy can be viewed here.
Halloween manicure 2011
Happy Halloween ladies!! Here is my Halloween mani for 2011. Halloween is definitely getting a lot more popular here in Aus. The stores are filled with costumes, props etc and most importantly there's heaps of limited edition Halloween food products available eeeeeeeek! I'm such a sucker haha. Now I only started my mani at like 10:30pm last night so my mani was a very last minute job but I think it turned out ok! I hadn't really thought out my mani properly (usually I plan a day or 2 before!) so I sort of just hoped for the best x) Frankenstein looks a little angry and cross-eyed but oh well haha!

Here's what I used:

Pinky: I used 2 coats of Color Club Wild at Heart and added Pa pumpkin Halloween sticker and silver Essence nail art glitter mix star dazzling gifted to me by my dear Christina.
Ring finger: Frankenstein nail! I used 3 coats of Sinful Colors Mint Apple and used Kiss nail art striper in black and a small nail art brush for Frankenstein's hair and mouth. For the eyes I used 2 different sized dotting tools* from Born Pretty Store and OPI Alpine Snow and Ulta 3 Black Satin.
Middle finger: Spider nail! I used 2 coats of Sinful Colors Cloud 9 as a base. I then freehanded the spider web using Kiss nail art striper in white and konaded spider design from Bundle Monster plate BM13 using Konad Special polish in black. Topped it off with a coat of my favourite China Glaze Fairy Dust!
Index finger: I used 2 coats of Ulta 3 Black Satin as a base and added a line of gold glitter down the middle using Art Deco striper in gold glitter. I then added Pa evil pumpkin and red ghost nail sticker and Essence nail art glitter mix silver star dazzling from Christina.
Thumb: Mummy nail! I used 3 coats of Color Club Who are you Wearing? as a base. I then used a small nail art brush to draw an oval using Kiss nail art striper in black and then used the striper to draw the lines. For the eyes I used 2 different sized dotting tools* from Born Pretty Store and OPI Alpine Snow and China Glaze Phat Santa.

How cute is this pumpkin lollipop! It was sent as part of a PR pack hehe


What do you think? What will you be rocking on your nails? If you're celebrating I hope you have a fabulous time!!
Thanks for looking as always! =)
* Product(s) sent to me for consideration but this in no way influenced my review in any way. As always, my reviews are my 100% honest opinion. My Disclosure Policy can be viewed here.
Here's what I used:
Pinky: I used 2 coats of Color Club Wild at Heart and added Pa pumpkin Halloween sticker and silver Essence nail art glitter mix star dazzling gifted to me by my dear Christina.
Ring finger: Frankenstein nail! I used 3 coats of Sinful Colors Mint Apple and used Kiss nail art striper in black and a small nail art brush for Frankenstein's hair and mouth. For the eyes I used 2 different sized dotting tools* from Born Pretty Store and OPI Alpine Snow and Ulta 3 Black Satin.
Middle finger: Spider nail! I used 2 coats of Sinful Colors Cloud 9 as a base. I then freehanded the spider web using Kiss nail art striper in white and konaded spider design from Bundle Monster plate BM13 using Konad Special polish in black. Topped it off with a coat of my favourite China Glaze Fairy Dust!
Index finger: I used 2 coats of Ulta 3 Black Satin as a base and added a line of gold glitter down the middle using Art Deco striper in gold glitter. I then added Pa evil pumpkin and red ghost nail sticker and Essence nail art glitter mix silver star dazzling from Christina.
Thumb: Mummy nail! I used 3 coats of Color Club Who are you Wearing? as a base. I then used a small nail art brush to draw an oval using Kiss nail art striper in black and then used the striper to draw the lines. For the eyes I used 2 different sized dotting tools* from Born Pretty Store and OPI Alpine Snow and China Glaze Phat Santa.
What do you think? What will you be rocking on your nails? If you're celebrating I hope you have a fabulous time!!
Thanks for looking as always! =)
* Product(s) sent to me for consideration but this in no way influenced my review in any way. As always, my reviews are my 100% honest opinion. My Disclosure Policy can be viewed here.
Subscribe to:
Posts (Atom)